Rclone is a command line program to manage files on cloud storage. It is a feature rich alternative to cloud vendors' web storage interfaces. Over 40 cloud storage products support rclone including S3 object stores, business & consumer file storage services, as well as standard transfer protocols. Rclone has powerful cloud equivalents to the unix commands rsync, cp, mv, mount, ls, ncdu, tree, rm, and cat. Rclone's familiar syntax includes shell pipeline support, and --dry-run protection. It can be used at the command line, in scripts or via its API. This page will describe rclone including instructions for using Pathfinder with rclone.
Contents
Overview
Since rclone is intended to be used with cloud technologies, any server that can use cloud protocols can use rclone to transfer data. ARCC’s on-premises cloud-like storage, Pathfinder, uses the S3 protocol that was developed by Amazon AWS. This enables researchers to store & share data on with all of the capabilities of cloud storage without the costs of a third-party vendor.
Features
MD5/SHA-1 hashes checked at all times for file integrity
Timestamps preserved on files
Partial syncs supported on a whole file basis
Copy mode to just copy new/changed files
Sync (one way) mode to make a directory identical
Check mode to check for file hash equality
Can sync to and from network, e.g. two different cloud accounts
Optional large file chunking (Chunker)
Optional encryption (Crypt)
Optional cache (Cache)
Optional FUSE mount (rclone mount)
Multi-threaded downloads to local disk
Can serve local or remote files over HTTP/WebDav/FTP/SFTP/dlna
What does rclone do?
Rclone can help you:
Backup (and encrypt) files to cloud storage
Restore (and decrypt) files from cloud storage
Mirror cloud data to other cloud services or locally
Migrate data to cloud, or between cloud storage vendors
Mount multiple, encrypted, cached or diverse cloud storage as a disk
Analyse and account for data held on cloud storage using lsf, ljson, size, ncdu
Union file systems together to present multiple local and/or cloud file systems as one
How to Use rclone
The following are step-by-step instructions for using rclone with Pathfinder.
Before going through these instructions please make sure you have access to Pathfinder (or any other cloud service you wish to use rclone with) and already have your Accesskey/Secretkey credentials
Step 1. Make sure rclone is installed
On a laptop or desktop
Before using Pathfinder with your own workstation with rclone, you will need to make sure you download it and it is installed properly from the rclone website. The rclone website also has much more information on using rclone including several commands and other documentation with installation instructions.
On Teton
A version of rclone is already installed on Teton to easily transfer data from Teton to Pathfinder. Once logged into Teton you can find out how to use rclone on Teton by using the module spider rclone command.
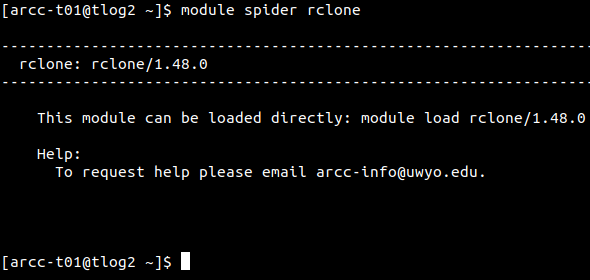
As you can see, at the time of this writing there is only one version of rclone installed on Teton. If a newer version of rclone is required, please email arcc-info@uwyo.edu to make the request. If there is more than one version of rclone installed on Teton, the module spider rclone command will show all versions and you will need to specify which version you want to use if the default version will not work for your use case.
Once you have identified which version use the module load rclone command to enable rclone on this Teton session. Once that is done, you can check to see if the rclone module is available by using the module avail command.
Step 2. Setting up the rclone .config file
Before using rclone you must set up a configuration file that details the information about the remote server you want to transfer data to. Since Pathfinder uses the S3 protocol, our following examples will all use S3, but it’s important to know that there are more options available.
There are two different ways of setting up your rclone configuration file:
Create the .conf file manually
If you know everything about rclone and the options that are available to include into your rclone configuration file, you can simply navigate to your .config folder in your home directory on Teton and create a folder for rclone to create a file to enter these options. Example below:
cd ~/.config
mkdir rclone
cd rclone
vim rclone-test.conf
and enter something like this:
[pf-mybucket] type = s3 provider = 3 env_auth = false access_key_id = <enter your access key here> secret_access_key = <enter your secret key here> endpoint = pathfinder.arcc.uwyo.edu acl = private
Using the rclone prompt to create the .conf file
Once rclone is available to use run the command rclone config to see the options to create the configuration file.
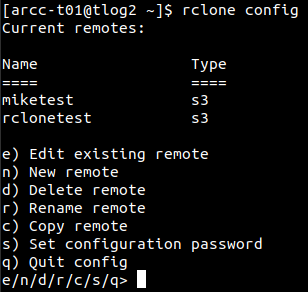
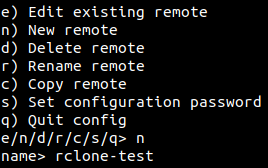
Enter the value you wish to start with. For the purposes of this example, we are going to start with a new remote. So the value we will enter is 'n' and we will give a name to remote we are going to create. Example below:
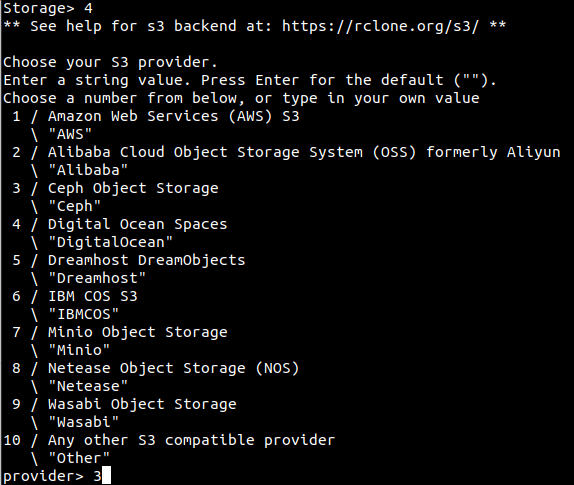
Next, you will be asked for a type of remote connection. Since Pathfinder uses Ceph which is an S3 compliant storage provider that is what we will choose, so the option “s3” is what we’ll choose and the value we will enter here is 4. However, it’s important to know that there are many options.

Once you have selected the “Amazon S3 Complaint Storage Provider you will need to specify that the config file uses Ceph. In this case option 3.
Next, you will be asked for AWS credentials. At this point we are going to enter “false” because if already have access to Pathfinder, ARCC has provided you with your Accesskey/Secretkey combo which we will enter at the next step.

Your Accesskey/Secretkey combo is unique to you or your research group. It is important to keep these secure to keep your data on Pathfinder protected. So your entries for each value will be something similar in the faux example below:
AWS Access Key ID.
Leave blank for anonymous access or runtime credentials.
Enter a string value. Press Enter for the default ("").
access_key_id> AKIAIOSFODNN7EXAMPLE
AWS Secret Access Key (password)
Leave blank for anonymous access or runtime credentials.
Enter a string value. Press Enter for the default ("").
secret_access_key> wJalrXUtnFEMI/K7MDENG/bPxRfiCYEXAMPLEKEY
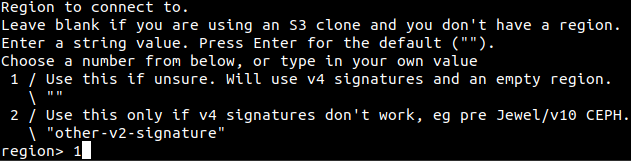
You will then be prompted to enter your region, here we are going to enter the value of ‘1' because we are using an on-premises storage this value doesn’t matter.
The next section asks for your endpoint to connect to. In our example the endpoint is the web address for pathfinder, pathfinder.arcc.uwyo.edu.

Next will be a location prompt, we are going to leave this blank since are also not using a region. Just hit enter/return to move on.
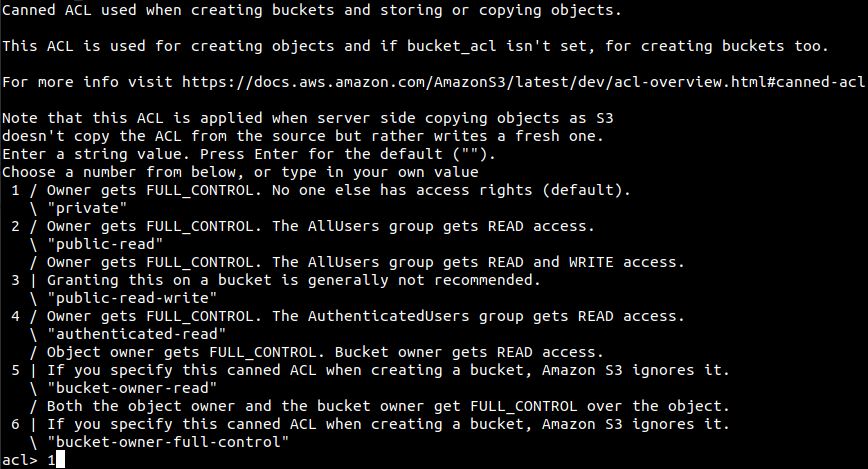
The last step in the configuration file setup to choose the acl settings. This part is very important. There are many options for both private and public read/write/delete permissions, take extra care in choosing the value you enter. This example is going to choose the “private” option for informational purposes only. We will enter the value ‘1' hit enter/return.
Next, choose ‘n' to not continue to advanced settings and the 'q’ to quit the configuration file set up.
Once that is completed, you can check your configuration file by navigating to your hidden .config folder and viewing the file.
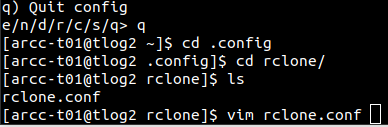
It should look similar to the manual configuration that we mentioned earlier.
Step 3. Basic usage commands for rclone
The basic syntax goes as follows rclone <function> <source> <destination endpoint>:<bucket><filename>.
the basic functions are:
copy
sync
move
check
mount
serve
More information on each function can be found at https://rclone.org/#what. An example of a copy from Teton to Pathfinder would be:
[arcc-t01@tlog2 ~]$ ls
rclonetest.csv
[arcc-t01@tlog2 ~]$ rclone copy rcloneTest.csv rclone-test:testbucket/